Server Guide#
As a user of MBO servers, you will be given a login to MBO servers, which will give you access to the servers.
Guidelines#
Log out from Windows after each session.
Store raw and processed data in your allocated user space
ID_USER_DATA.Delete unused data when no longer needed to conserve shared storage.
Do not browse the internet on the MBO servers.
Do not install software on your own. Consult with the MBO admins with a request.
Connecting with RDP#
MBO processing servers are accessible via Microsoft Remote Desktop Protocol (RDP).
There are a few common applications, depending on your operating system:
via Windows App#
You will need the following information to access the servers:
Server IP address
Username
Password
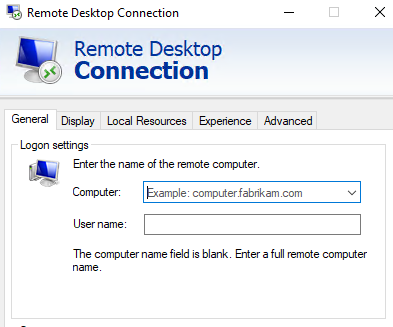
To add an MBO User Account:
Add (+) -> PC
Enter IP address (XXX.XX.X.XX) in
PC nameEnter Username in
User accountEnter Password in
PasswordChoose an optional display name
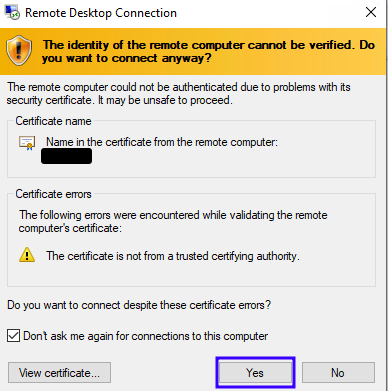
Accept the certificate notification popup to continue connecting to your MBO server.#
You should now be able to connect to the MBO servers!
via Browser#
Note: You may need to disconnect from a VPN tunnel to connect from the rockefeller vpn website.
Open a browser and navigate to https://vpn.rockefeller.edu/
Login with your VPN Username and Password
Accept the 2-Factor Authentication prompt
Scroll down to HTML5 Access Sessions and expand it
In the Remote Desktop Session to Hostname or IP box, enter:
SERVER_NAME.rockefeller.edu
Click Launch
Enter your MBO username (e.g.,
MBO-Delta) and password
Development Environment#
Organize Your Code#
Keep all related analysis projects in a single directory for consistency.
For example:
cd "C://Users//MBO-User//projects"
You can also choose another folder such as C://Users//MBO-User//code.
Terminal#
We recommend Windows Terminal (which should be pinned to taskbar).
You can also use VSCode or Pycharms integrated terminals.
If there is a terminal you’d like to try, please contact an administrator on slack.
Warning
On Windows, when copy-pasting a filepath into the terminal, you may have to change forward slashes (‘/’) to either double forward (‘//’) or single back (‘’) slashes.
This is also why all python examples with filepaths as strings use r”path/to/file”, to allow the single slash.
PS C:\Users\MBO-Delta\projects> cd .\my_project\
PS C:\Users\MBO-Delta\projects\my_project> ls


    Directory: C:\Users\MBO-Delta\projects\my_project


Mode                 LastWriteTime         Length Name
----                 -------------         ------ ----
d-----        10/21/2025  11:59 AM                .venv
-a----        10/21/2025  11:59 AM            109 .gitignore
-a----        10/21/2025  11:59 AM              7 .python-version
-a----        10/21/2025  11:59 AM             88 main.py
-a----        10/21/2025  12:00 PM            220 pyproject.toml
-a----        10/21/2025  11:59 AM              0 README.md
-a----        10/21/2025  12:00 PM         645708 uv.lock


PS C:\Users\MBO-Delta\projects\my_project>
Create a Project Environment#
We recommend using uv for managing Python environments. See the Virtual Environments Guide for detailed instructions.
Quick start (recommended):
mkdir my_project
cd my_project
uv init --python 3.12.9
uv add mbo_utilities lbm_suite2p_python
This creates a .venv folder, pyproject.toml, and uv.lock for reproducible environments.
To restore an environment:
rm -r .venv
uv sync
VS Code#
Most IDE’s like VSCode and Pycharm will automatically detect environments when you open a folder that contains a .venv directory, which happens when you run uv venv --python 3.12.9.
If your environment isn’t being detected automatically, you can:
Run
code .from a terminal already inside your projectEnter the path manually with Cntl + Shift + P -> Python: Select Interpreter -> Enter interpreter path -> Browse -> Navigate to
C://Users//MBO-User//projects
Option 2 is also useful for using an environment stored elsewhere, e.g. D://W1_SOFT//envs, where we plan to keep stable environments in the future.
Jupyter#
Jupyter is easist to set up on the terminal.
Set a password for this jupyter session:
uv run jupyter server password
From within my_project:
uv run jupyter lab
Pycharm#
Pycharm is particularly useful for it’s debugger, which when used properly will make even the most complicated analysis easy to manage. Pycharm is available to all MBO Server Users.
If you don’t know how to use a debugger and have a need for it, we can get you started and set up a debugging environment.
Tutorial documentation coming soon.
Logging out#
Warning
If you don’t properly sign-out, you will use more login-sessions than you are afforded and your account will need to be logged out forcefully.
To sign out, Windows Menu -> Username -> Sign Out
Filesystem#
Each server has an ID that prepends the computer name.
Each directory for this system will have this ID prepended to the directory name.
Warning
Both workstation and compute file-systems are NOT backed up.
Users should have their own copies of all data on MBO servers.
The D: drive is read-only and contains:
D:/ID_SOFT/repos: Data processing softwareD:/ID_SOFT/apps: ApplicationsD:/ID_DATA/username: Raw data that users will frequenly access will be saved here.
The E: drive is the user sandbox, with a directory E:/ID_USER_DATA/username for each user.
This is where your intermediate results should go.
Internet Access
Users are strongly discouraged to browse the internet on the compute server, browsing should be done on your local machine only. A browser is available for Jupyter notebooks, but internet access is discouraged.
Other Software#
MATLAB
Fiji / ImageJ
Irfanview (photo/video viewer)
git bash
wezterm
Contact a server administrator to inquire about adding additional software.
Please do not install software without consulting an MBO admin.
Connecting to Network Servers#
Computers on the Rockefeller network (with network discoverability turned on) can be accessed via SMB as \\server-name or \\ip-address.
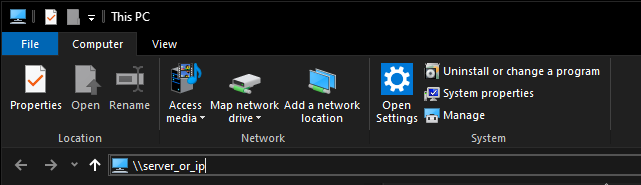
You will be prompted for username/password credentials the first time you connect.
SSH Connections#
ssh is a communication protocol that will allow you to access MBO servers from the command line.
To establish a connection, the computer you are connecting from (the ‘client’) must have a private ssh key.
This guide provides an example of generating this key to authenticate github.com, but the process is the same.
This process will generate 2 files:
ed25519Never share this
Stored in your
.ssh/folder
ed25519.pubThis is what you send to MBO
Can be safely shared
Depending on the algorithm you choose, the filename may be different.
What matters is that the .pub file (e.g. ed25519.pub) is installed on the MBO servers.
Talk to an MBO admin to add your ssh-key to the server.